

We cannot find a coaster in this house. Not one. I have bought them, I have been given them, and they vanish — into bedrooms, under couches, out to the shed for reasons nobody will explain to me.
Oh, was that just at my house?
So when I found myself with a growing pile of cord offcuts I could not bring myself to throw away — a category of thing I have far too much of, along with fabric scraps and buttons and jars — coasters seemed like the obvious answer.
And I made these ones in blue.
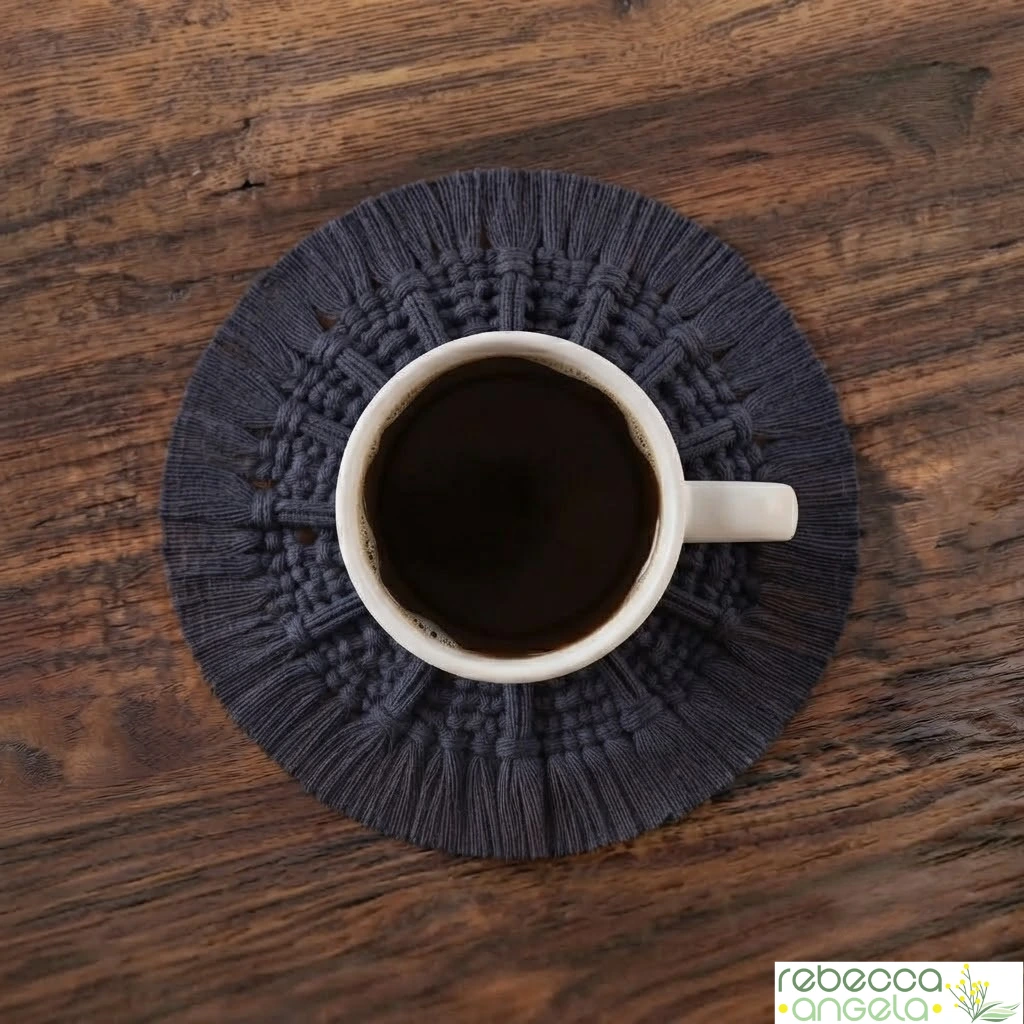
That was a small departure for me. Nearly everything I have knotted so far has been natural cotton, partly because it is the classic look and partly because it hides a beginner’s uneven tension rather well. But I had a roll of blue in the cupboard, the kitchen needed something, and I have written before about how easily we talk ourselves out of the interesting choice. So: blue.
I am glad I did. They look deliberate rather than earnest, if that makes sense, and they are the first thing I have made that my family have actually commented on unprompted.
This is a genuinely quick project — about half an hour each once you have the rhythm — and it uses one knot. If you have made the plant hanger, this will feel like a rest.
So, on with the tutorial…
This makes one coaster about 11cm across, plus a short fringe. Sizing for larger coasters and placemats is further down.
Materials
Per coaster:
- 6 lengths of 4mm cotton cord, each 40cm — your starting cords
- 1 length of the same cord, about 2m — your working cord
- 12–14 extra lengths at 40cm, to add in as you go
- Sharp scissors
- A comb or pet slicker brush
- Optional: a few pins and a cork board or cushion to pin your work to
That is around 8m of cord per coaster, so a set of four uses about 32m. Genuinely a scrap project.
On colour: mine are 4mm cotton in blue. Natural is the classic, and it does hide wobbly tension better, but a coaster is small enough that a colour reads as a choice rather than a mistake. If you have been sitting on a roll of something bright, this is the project for it.
Instructions
Step 1: Cut your cords
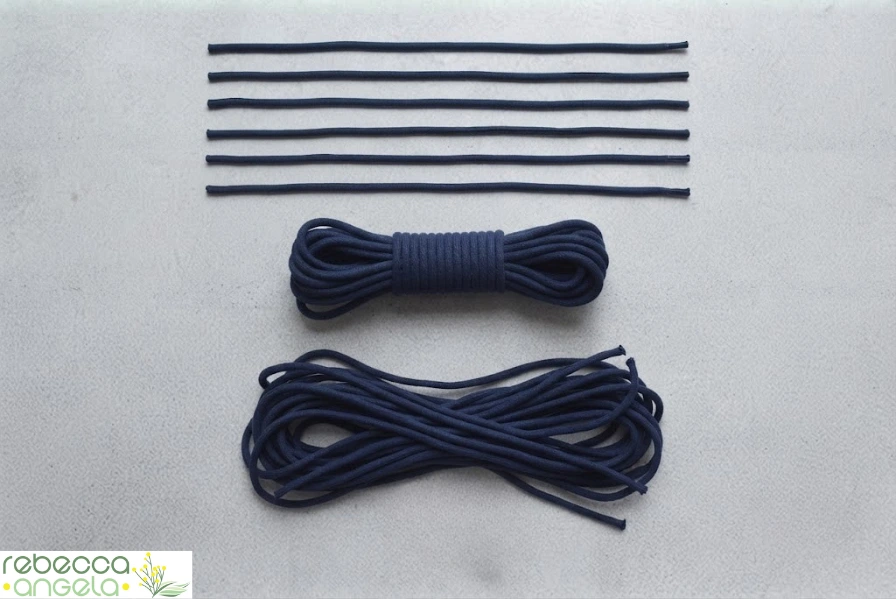
Six at 40cm. One at 2m. Then another twelve or so at 40cm, set aside in a pile — you will be reaching for these throughout, and cutting them now saves stopping mid-round.
Tip: Do not cut the working cord short. Two metres feels absurdly generous for a coaster 11cm across, and you will use most of it. Every round is longer than the last, and the outer rounds eat cord surprisingly fast.
Step 2: Make the centre ring
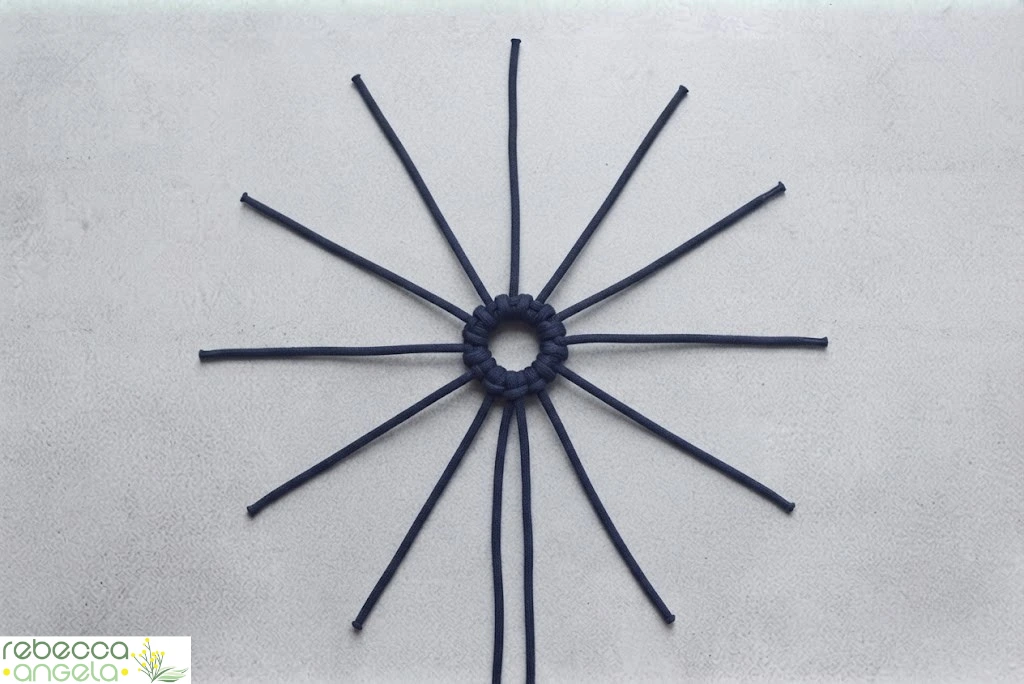
Gather your six 40cm cords and lay them side by side. Take your long working cord and tie it around the whole bundle near the middle, then bring the ends together to form a small ring — no more than 1.5cm across — and knot it closed.
You should now have a tiny circle at the centre with all the cord ends radiating outwards like a sunburst, and one long working cord ready to go.
Note: Keep this centre ring small but not tight. A ring the size of a five-cent piece is about right. If you cinch it down to nothing, the whole coaster will pucker from the middle out, and there is no fixing that later.
Step 3: Start knotting in rounds
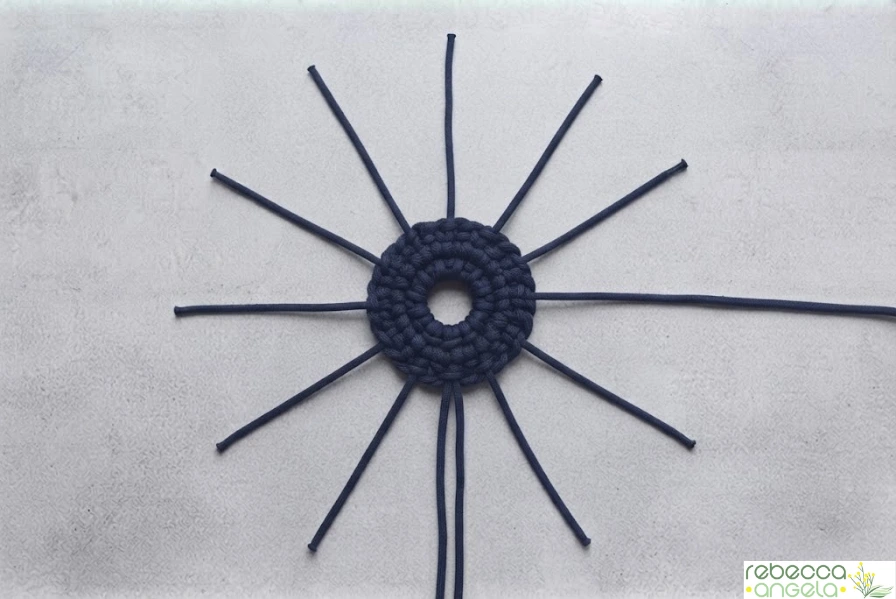
Take your working cord and lay it across the radiating cords, running around the circle. This is your holding cord.
Now tie each radiating cord onto it with a double half hitch — up, over, down behind, out through the gap, then repeat with the same cord. Two half hitches per cord, snugged up beside each other.
Work your way around the circle. When you get back to the beginning, simply carry on into the next round — the working cord spirals outwards rather than stopping and starting.
If the double half hitch is new to you, it is stepped out with photos in the knots post. It is the same knot that makes the horizontal bars on a wall hanging; here you are just working it in a circle instead of a straight line.
Step 4: Adding cords as you go
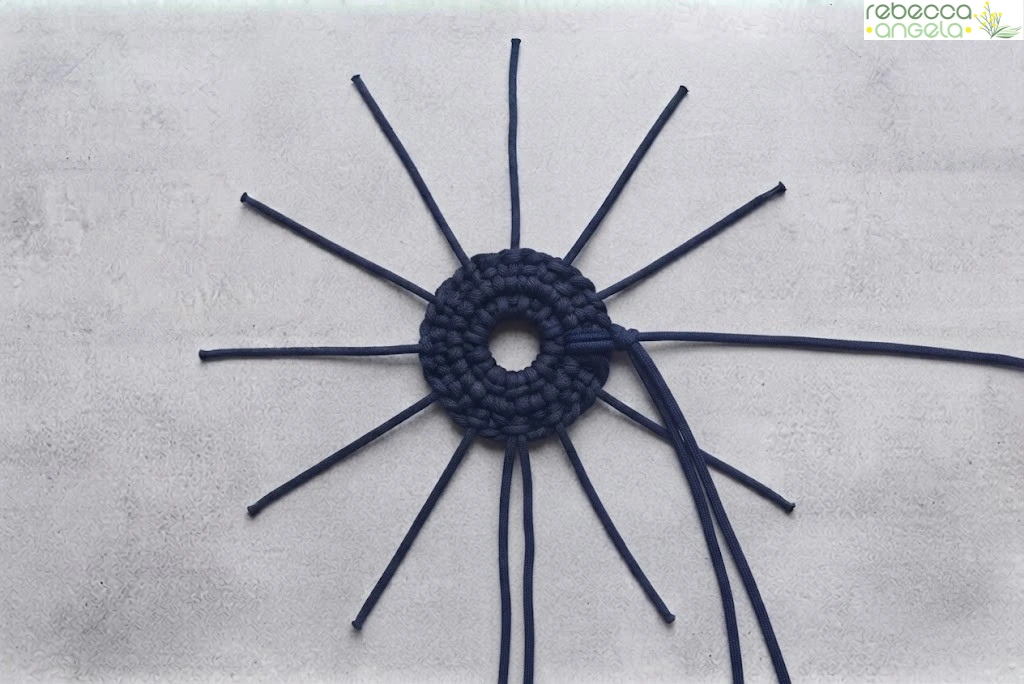
Here is the thing that makes a coaster work.
As your circle grows, the distance around it grows too — and your original six cords cannot stretch to fill it. Every round or so you will see a gap opening up between two knots, wider than the others.
When you see one, take a fresh 40cm cord, fold it in half, and attach it into the gap with a lark’s head knot over the working cord. Slide it snug against the previous knot and carry on.
You will add roughly twelve to fourteen extra cords over the whole coaster. There is no formula. You watch for the gaps and fill them.
Tip: Add a cord the moment a gap looks slightly too wide, not once it is obviously too wide. A coaster with evenly spaced knots is the difference between something that looks made and something that looks homemade, and it costs you nothing but attention.
Step 5: Keep going to six rounds
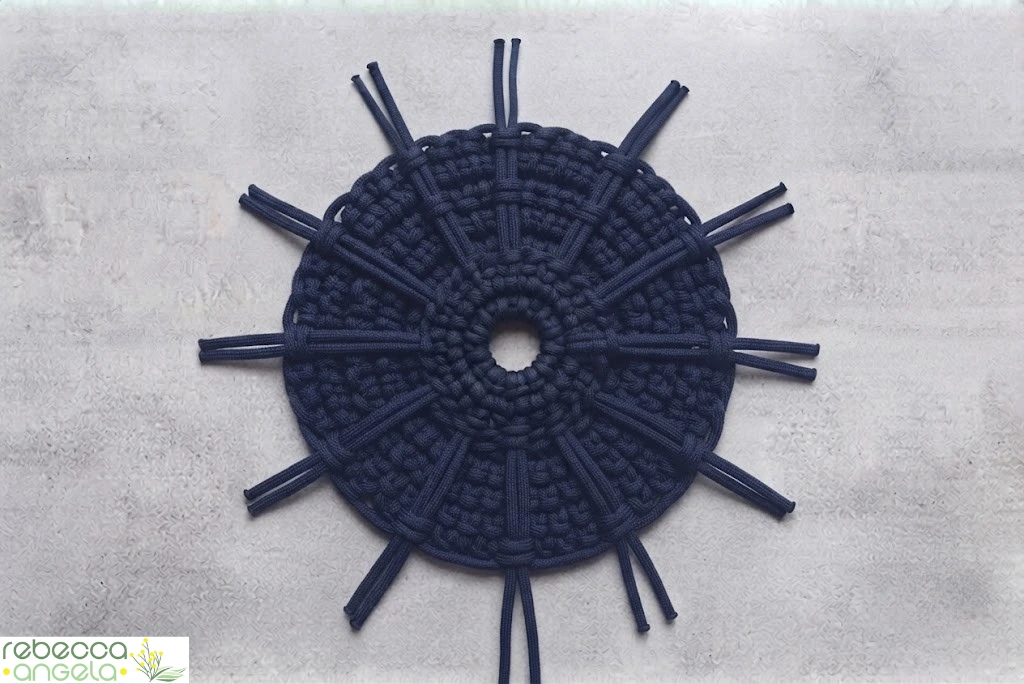
Carry on spiralling outwards, knotting and adding, until you have six rounds. That gives you a coaster around 11cm across — comfortably bigger than a mug base, which is what you want.
Five rounds makes a small one for a glass. Seven or eight starts heading towards a teapot stand.
When you reach the end of your last round, tie the working cord off with a firm knot against the back of the work and trim it close.
Step 6: Trim and comb the fringe
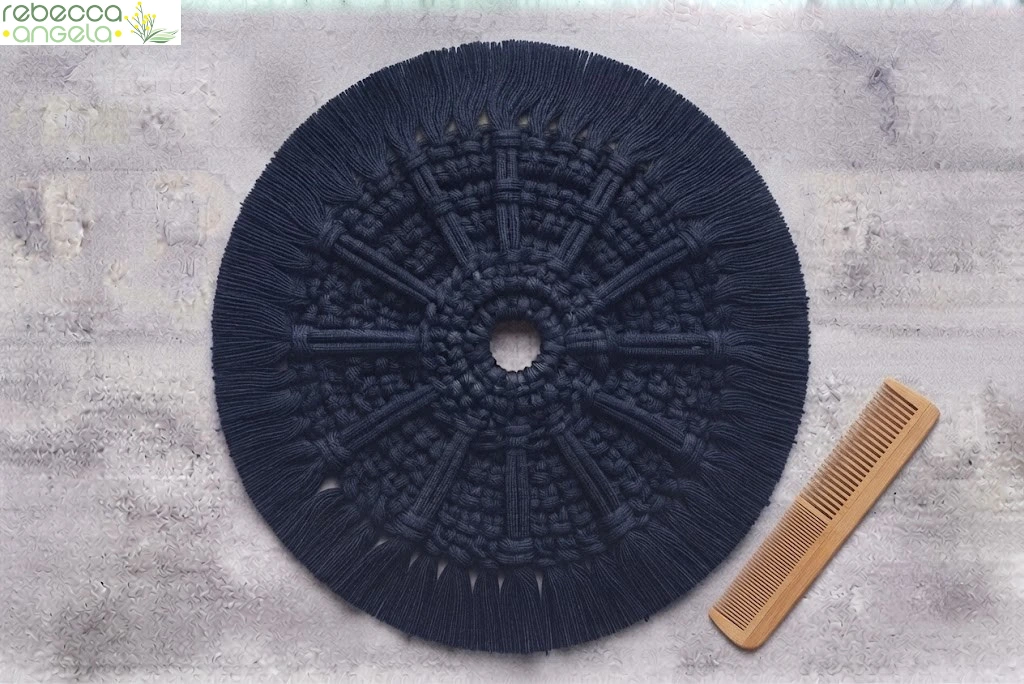
Cut all the radiating ends down to about 5cm to start with — longer than you want, because you cannot put it back.
Then comb them out with your slicker brush until they fluff and soften. Three-ply cotton opens into a lovely wavy fringe here; single-strand gives you something curlier.
Finally, trim to your preferred length. I keep mine short, about 1.5cm, so the coaster reads as a neat disc rather than a fringed thing. Longer fringe looks lovely on a shelf and gets in the way of a mug.
Give it a press flat under a heavy book overnight if it needs encouraging.
And you are done!
Why coasters curl up (and how to stop it)
This is the problem absolutely everybody has with round macrame, and it is worth its own section because almost nobody explains it properly.
You finish your coaster, put it down, and it will not lie flat. It cups upwards into a shallow bowl.
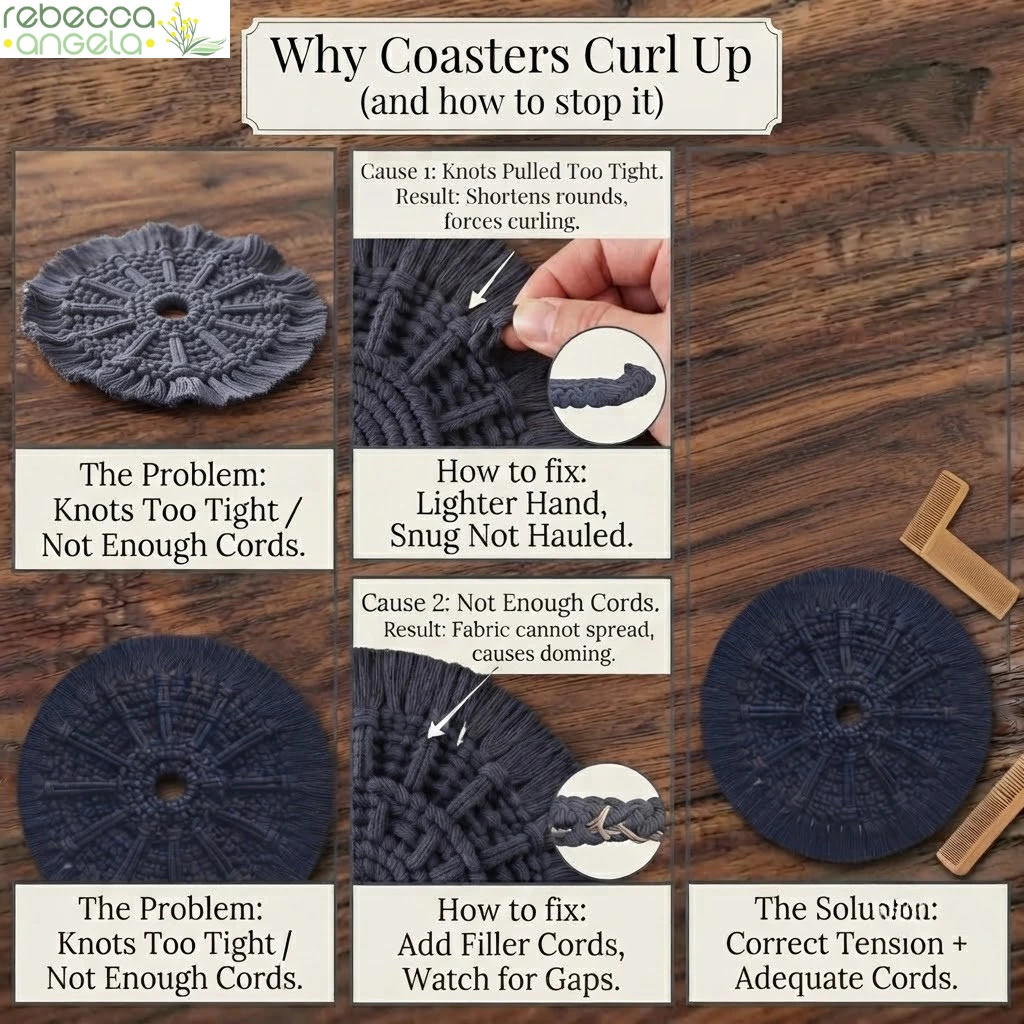
There are two causes.
Your knots are too tight. This is the main one. Each round needs to be a fraction longer than the one before it to keep up with the growing circumference. Pull every knot hard and you are effectively shortening each round, and the work has nowhere to go but up. Snug, close together, but not hauled tight. This is a matter of touch, and it comes with practice.
You have not added enough cords. Same maths from the other direction. If the number of cords stays the same while the circle grows, the fabric cannot spread and it domes. Watch for gaps and fill them.
If it curls badly, undo the last two rounds and redo them with a lighter hand. It undoes perfectly — no damage, no holes, no seam ripper required — which is exactly why I keep saying macrame is such a kind craft to be a beginner at. I have written more about that in Recovering from Creative Mistakes.
A slight dome can also be persuaded flat by damping the coaster, pressing it under something heavy and letting it dry. But it is far better to fix the tension than to flatten a mistake.
Which cord to use
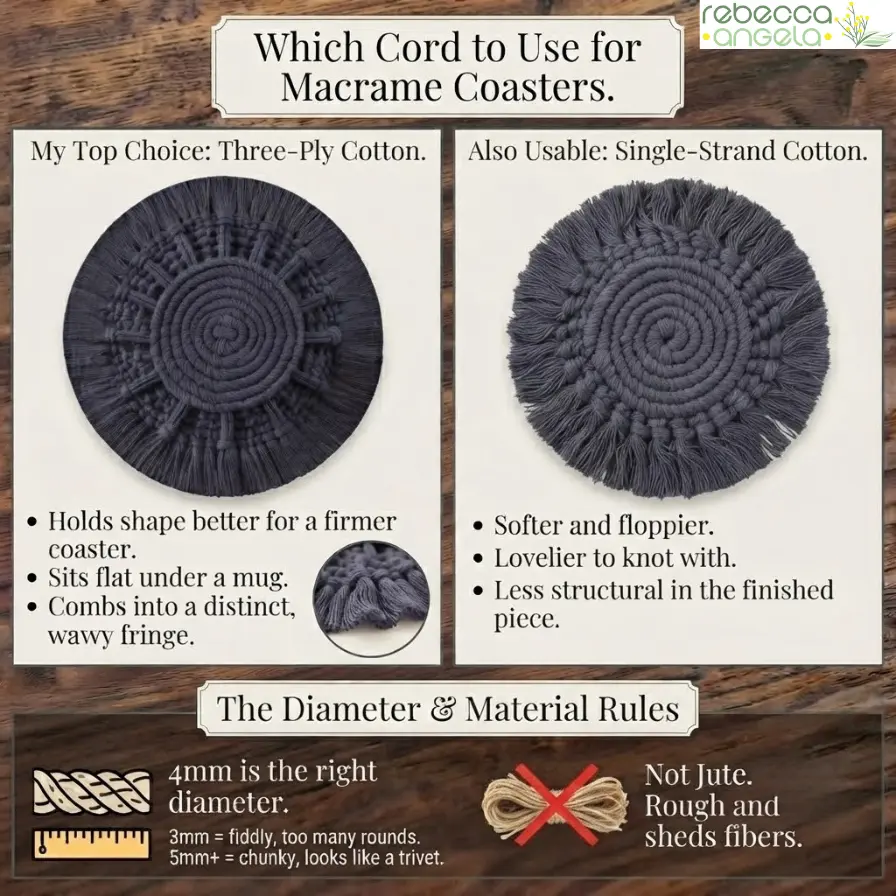
This is worth two minutes of thought, because coasters get more handling than anything else in the house.
Three-ply cotton holds its shape better and gives you a firmer coaster that sits flat under a mug. It combs into a wavy fringe. This is what I would choose.
Single-strand cotton is softer and floppier. Lovelier to knot with, slightly less structural in the finished piece — perfectly usable, just a bit more relaxed.
4mm is the right diameter. 3mm makes a fiddly coaster with too many rounds; 5mm and up gets chunky and starts looking like a trivet.
Not jute. Rough, and it sheds fibres you do not want under a drinking glass.
There is more on all of this — construction, diameter, where to buy in Australia — in the cord and supplies post.
Making a set
One coaster looks like a test piece. Four or six look deliberate. I do not know why this is true, but it is.
A few things I worked out making mine:
Do them in one sitting if you can. Your tension settles as you go, and a coaster made on a Tuesday will not quite match one made a fortnight later. Same reason the top of a beginner’s plant hanger is always tighter than the bottom.
Count your rounds, do not eyeball them. Six rounds each, every time. It is the only way they come out the same size.
Vary the colour, not the size. A set in three shades of the same weight looks considered. A set in three different sizes looks like you lost interest.
They make a very good gift. Four coasters tied with a length of the same cord costs almost nothing and looks like you tried, which is the ideal ratio for a gift in my opinion.
Caring for them
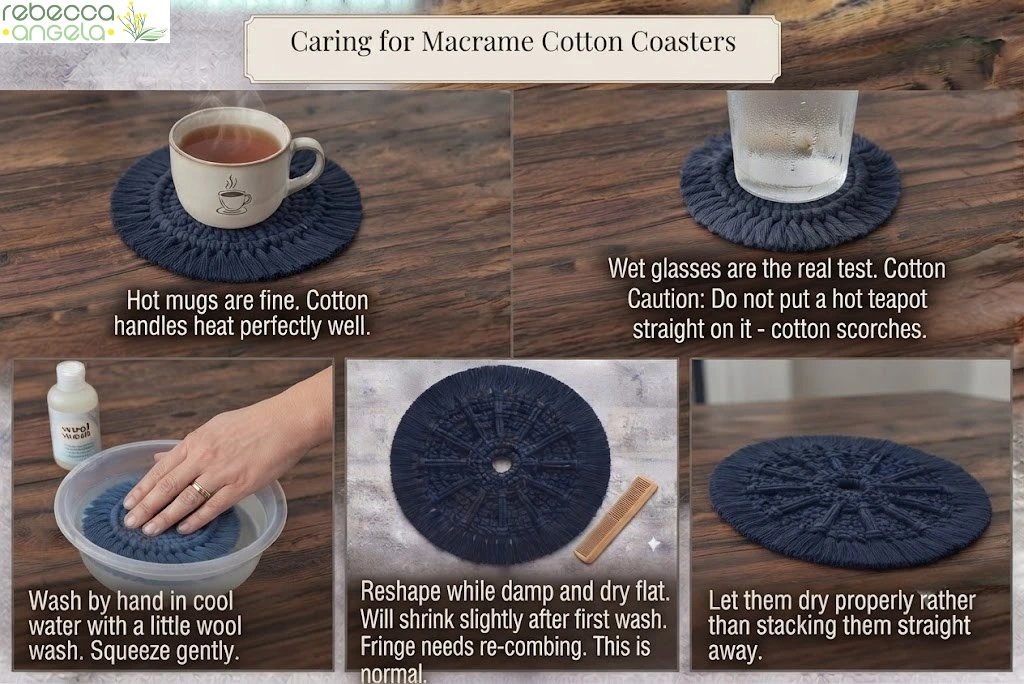
Hot mugs are fine. Cotton handles a hot cup of tea perfectly well. I would not put a hot teapot straight onto one — cotton scorches, and a damp cord under real heat can mark timber underneath.
Wet glasses are the real test. Cotton absorbs, which is rather the point, but a very wet glass on a cotton coaster will leave the coaster damp. Let them dry properly rather than stacking them straight away.
Wash by hand in cool water with a little wool wash, squeeze gently, reshape while damp and dry flat. Never the machine — it beats the knots out of shape and felts the fringe into rope.
They will shrink slightly the first time they are washed, and the fringe will need a re-comb. This is normal.
Questions people ask
How do I stop my macrame coaster from curling up? Tie your knots snug but not tight, and add extra cords whenever a gap opens up. Curling means each round is not keeping up with the growing circumference — either the knots are too tight or there are too few cords.
What knot is used for macrame coasters? The double half hitch, worked in a spiral around a central ring, with lark’s head knots used to add new cords as the circle grows.
How much cord do I need for a macrame coaster? About 8m of 4mm cord per coaster — six starting cords at 40cm, a 2m working cord, and twelve to fourteen more 40cm cords added as you go.
What size should a macrame coaster be? Around 11cm across works for a mug. Six rounds of knotting gets you there with 4mm cord. Five rounds makes a smaller one for a glass.
Can macrame coasters take a hot mug? Yes. Cotton handles a hot drink without trouble. Avoid putting a hot teapot directly on one, and let them dry properly if they get wet.
Can I make a placemat the same way? Yes — same method, just keep going. Expect to want a 5 or 6mm cord and a great deal more of it, and to add cords far more often as the circle widens.
So there you have it. Half an hour, a handful of offcuts, and a coaster that will still go missing within a fortnight — but at least now I can make more.
I am pleased I went with the blue. It has made me want to try a few other things in colour, which was not where I expected this to go.
Have you made round macrame? Did yours curl, and did you work out the tension in the end? And what colour would you make yours — natural, or something with a bit of nerve about it? Tell me in the comments below.

