
In the first post in this series I told you about sitting on the floor beside my mother, aged about seven, with four lengths of cord tied to the leg of a chair.
That was the whole lesson. Four cords, one chair leg, and “again”.
I did not understand at the time that she was teaching me properly. I thought she was keeping me out of the way. But that is genuinely how you learn macrame — you tie the same knot until your hands stop needing your brain’s help, and then you go and make something.
So today, the knots. And here is the good news I keep repeating because it still delights me: there are only five you need. Everything you have ever admired — the plant hangers, the great fringed wall hangings, the bags, the owls — is these five knots, repeated and combined.
Get yourself about 2m of cord, cut into four lengths, and tie them onto something. A chair leg. A door handle. A wooden spoon taped to the table. It does not matter.
Before you start: working cords and filler cords
One piece of vocabulary, because every pattern you read will assume you know it.
When you tie a square knot you use four cords. The two on the outside do the moving — those are your working cords. The two in the middle just sit there and get knotted around — those are your filler cords.
That is it. Working cords move, filler cords wait. If you understand that, most patterns suddenly make sense.
1. The lark’s head knot
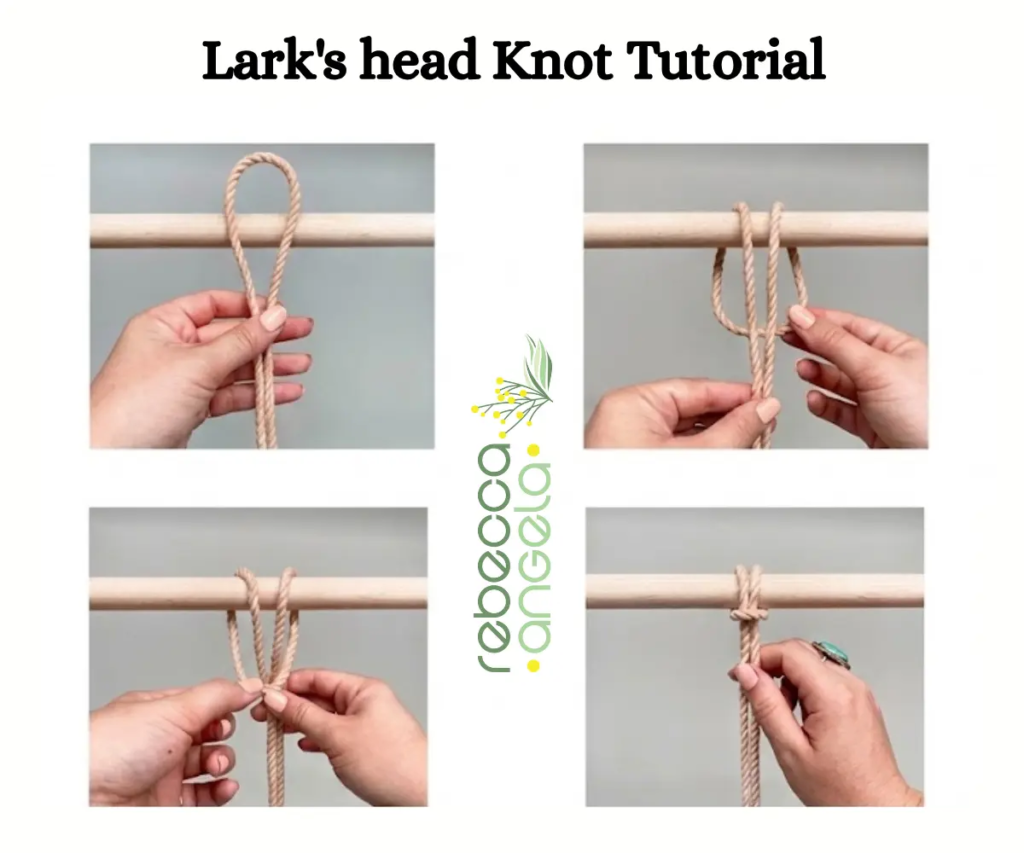
This is how you attach cord to a dowel, ring or branch. Almost every project starts with it.
- Fold your cord in half so the two ends are together and you have a loop at the fold.
- Lay the loop over the front of the dowel and let it hang down behind.
- Bring the loop up behind the dowel, then forward over the top.
- Pass both cut ends through the loop.
- Pull the ends down firmly to tighten.
You will now have a small horizontal bump sitting on the front of the dowel, and two working cords hanging down.
Note: Fold the cord in half means one cut length becomes two working cords. So when a pattern asks for 16 cords, you cut 8 lengths. Getting this the wrong way round is a genuinely expensive mistake — I have written more about cord quantities in the cord and supplies post.
Tip: If you want the bump on the back instead of the front, do exactly the same thing but start with the loop behind the dowel. That is called a reverse lark’s head, and it gives a smoother, cleaner front edge. Both are correct. Pick whichever you like the look of and be consistent within one piece.
2. The square knot
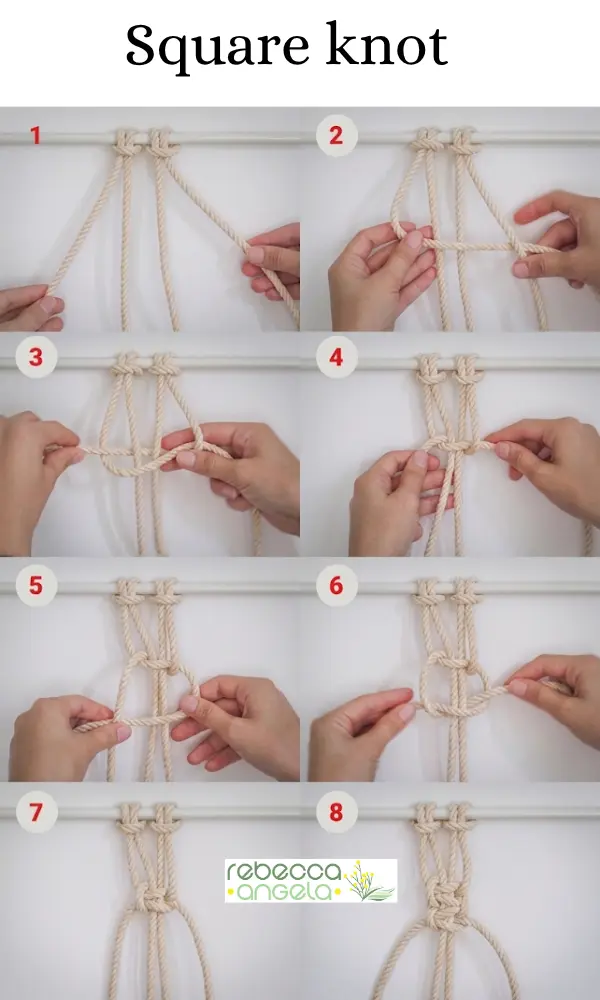
The workhorse. This is the knot my hands remembered after forty years, and once you have it, you can genuinely make things.
You need four cords. Number them 1, 2, 3, 4 from the left. Cords 1 and 4 are your working cords; 2 and 3 are the fillers and they do not move.
The first half:
- Take cord 1 across the front of cords 2 and 3, and lay it over the top of cord 4. It should make a shape like the number 4.
- Take cord 4, pass it over the tail of cord 1, then behind cords 2 and 3, and bring it up through the loop on the left.
- Pull cords 1 and 4 evenly until the knot sits snug under the dowel.
The second half — the mirror image:
- Take cord 4 (now on the left, because they have swapped) across the front of the fillers and over cord 1. A backwards 4.
- Take cord 1, pass it over that tail, behind the fillers, and up through the loop on the right.
- Pull evenly again.
Two halves make one square knot. It looks like a neat little raised square with a bump on each side.
The single most useful thing I can tell you: if your square knots are coming out twisted rather than flat, you are doing the same half twice instead of alternating. Start left, then start right. Left, then right. Say it out loud if you need to — I did.
3. The half knot (and the spiral)
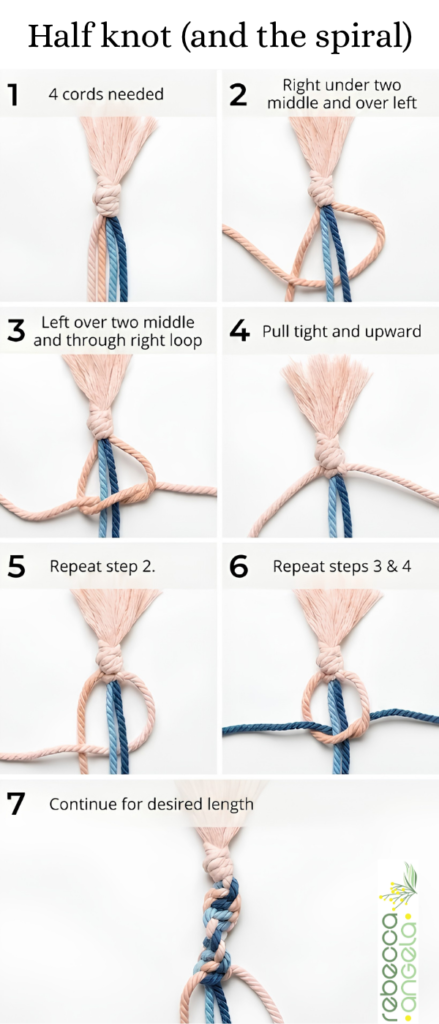
Here is a lovely piece of value for money.
Do only the first half of the square knot, over and over, without ever mirroring it.
That is a half knot. Repeat it fifteen or twenty times and the work will begin to twist itself into a spiral, all on its own. You are not doing anything clever. The knot is simply lopsided, and lopsided repeated enough times becomes a corkscrew.
Tip: After every three or four half knots, let the piece rotate a quarter turn in your hands rather than fighting it. If you hold it rigid, the twist fights back and your tension goes strange.
A spiral section down each arm is what gives a plant hanger that classic seventies look. My mother’s hangers were spirals almost the whole way down.
4. The double half hitch
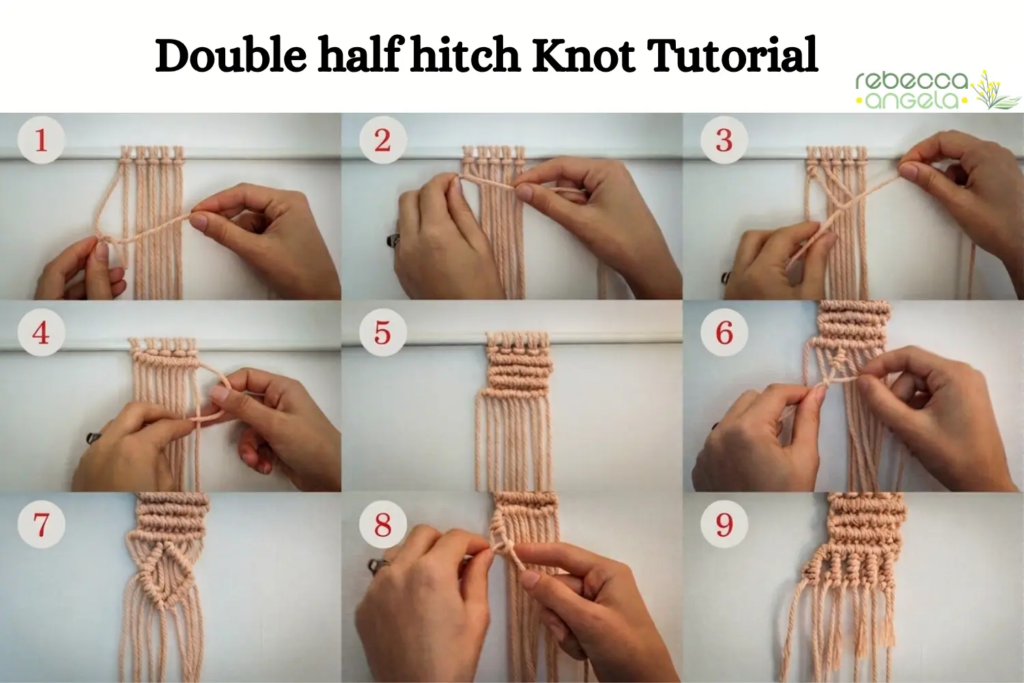
This is the knot that draws lines — the horizontal and diagonal bars you see across wall hangings.
You need a holding cord: one cord laid across the others in the direction you want your line to go. It can be one of your existing cords pulled sideways and held taut.
For each cord you want to attach to it:
- Bring the cord up and over the holding cord, then down behind it, and out through the gap it has just made. That is one half hitch — pull it snug up against the holding cord.
- Do exactly the same thing again with the same cord, right beside the first. That is the double half hitch.
- Move to the next cord along and repeat.
Work your way across and you get a firm, tidy raised line.
Note: Keep the holding cord taut and at a consistent angle the whole way across. If it sags in the middle, your line will sag too, and there is no rescuing it afterwards — you simply undo and go again. Tension is the whole game with this knot. It is also, as my mother pointed out at some length down the telephone, the whole game with macrame generally.
5. The gathering knot
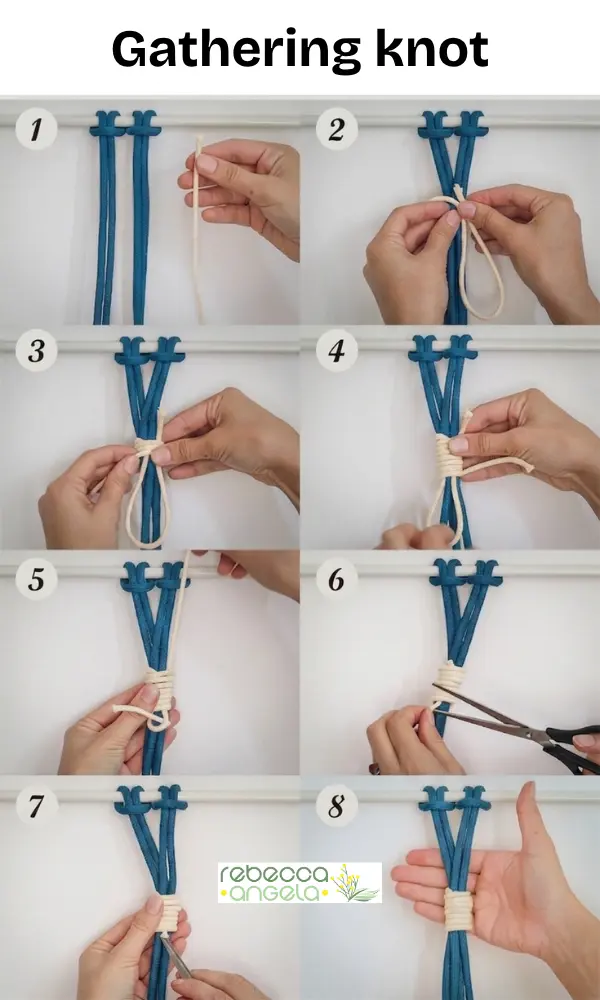
Also called a wrapping knot. This is how you bundle a group of cords together — at the top of a plant hanger just under the ring, and again at the bottom above the fringe.
You need a separate length of cord, about 1m for a decent-sized wrap.
- Make a long, narrow U-shaped loop at one end of your wrapping cord, and lay it flat down the front of the bundle, with the bend of the U pointing downwards.
- Take the long working end and begin wrapping firmly around the bundle and the U, starting at the top and working down. Keep the wraps tight and neat, one snug beside the last.
- After six to ten wraps, thread the working end through the bottom of the U loop.
- Now pull the top tail of the wrapping cord upwards. The U will pull closed and drag the working end up underneath the wraps, hiding it completely.
- Trim both tails flush.
The first time this works you will feel like a magician. It is the single most satisfying knot in the whole craft, and it looks far harder than it is.
Putting them together
That is the lot. Lark’s head to start, square knots for the body, half knots when you want a spiral, double half hitches for lines, and a gathering knot to bundle it all up.
Practise them on your chair leg until you can tie a square knot without looking at your hands, then go and make something with them. My strong suggestion is the plant hanger — it uses four of these five knots and you can finish it in an evening.
Do not wait until your practice knots are perfect. They will not be perfect, and the finished thing does not need them to be. This is process-over-product territory, which is a hill I will happily die on, and I have written about it more than once when things have gone wrong.
Again. That is all Mum ever said. Again.
Questions people ask about macrame knots
How many macrame knots do I need to learn? Five: the lark’s head, the square knot, the half knot, the double half hitch and the gathering knot. Nearly every macrame project is made from these, repeated and combined in different arrangements.
What is the most common macrame knot? The square knot. It forms the body of most plant hangers, wall hangings and bags, and it is the first one most people learn.
Why are my square knots twisting? You are repeating the same half of the knot instead of alternating. A square knot is left-start followed by right-start. If you only ever start from the left you are tying half knots, which spiral by design.
What is the difference between a half knot and a square knot? A square knot is two halves, mirrored, and lies flat. A half knot is just the first half, and repeated it twists into a spiral. Same movements — the difference is whether you alternate.
How do I keep my macrame tension even? Pull each knot up to the same point with the same amount of force, work in decent light, and stop when you are tired. Tension drifts as you relax over an evening, which is why the top of a beginner’s first piece is usually tighter than the bottom. Mine certainly was.
So there you have my five knots. Tie them badly a hundred times and you will have them for life — mine sat quietly in my hands for four decades and came back when I asked.
Which one are you finding fiddly? Tell me in the comments and I will do a closer step-by-step on it.
Next in the series: Macrame Plant Hangers — Tutorial and Free Patterns.
Happy knotting!