This is a quick and easy tutorial to make a fabric button suffolk puff brooch. And it is a great way to show off a couple of your favourite fabric scraps – I know we all have them stashed away somewhere!
I first made Suffolk puffs (also known as Yo-yos) in a needlework class in high school. I’m pretty sure it wasn’t called needlework but you know what I mean! I had to make what seemed to me at the time as hundreds of them to create the shell of a stuffed toy turtle (actually it was a tortoise because it was a land animal but anyway…) Making Suffolk puffs is super easy and something children can do too too. It practices some good skills such as cutting out and running stitch. Once you have mastered them, you can make a heap of them to make this gorgeous quilt by Amy Butler. But I have a much less ambitious project for you today – it only requires one puff! Here’s how to make a gorgeous brooch that features a fabric covered button.
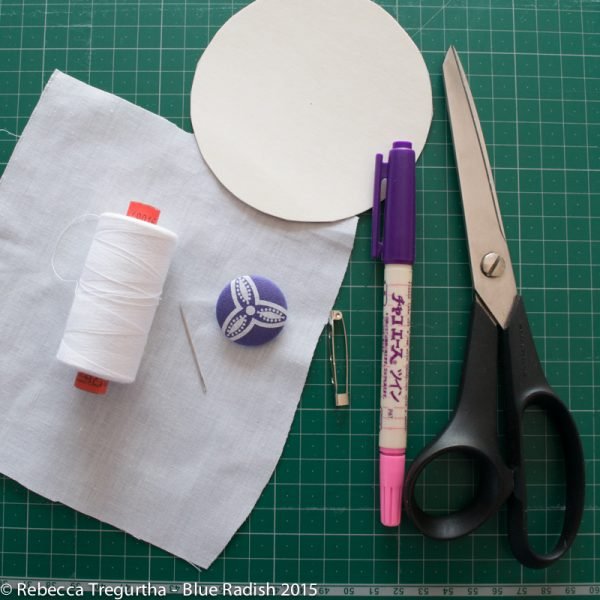
Equipment and Supplies:
- Scrap of fabric about 15cm x 15cm
- Hand sewing needle and thread
- Scissors
- Fabric marker
- One 28mm fabric covered button (purchased or make your own, see Notes)
- Brooch pin (or sturdy safety pin)
- Circular template about 10-12cm in diameter (see Notes)
How to
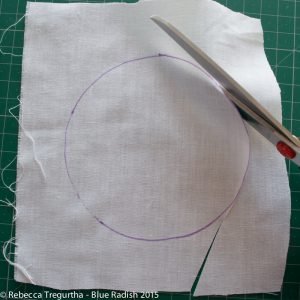
1: Trace around the template with a marker onto the wrong side of your fabric scrap. Cut the circle out.
2: Thread up your needle and make a double (or triple) knot in the end so that it doesn’t pull through your fabric when you pull it through for your first stitch.
3: Fold the edge of the fabric toward the centre of the circle on the wrong side of the fabric about 7mm. There is no need to fold all the way around the circle to begin with. Just make a start and you can fold as you stitch around the circle.
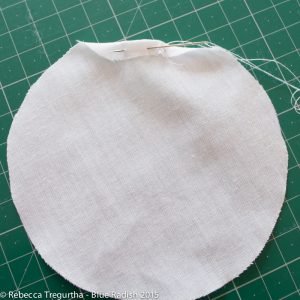
4: About 5mm from the folded edge, starting on the wrong side of the circle, make a small stitch (2mm long) and backstitch to the starting point to secure your thread. You are going to be pulling this thread up to gather the puff so you want to be able to put some force on the thread without it slipping through the fabric.
5: Now stitch a running stitch all the way around about the circle, folding the hem as you go and staying about 5mm from the folded edge. Make your stitches about 1cm long so that the hole in the middle of the puff is quite small when you gather up the fabric.
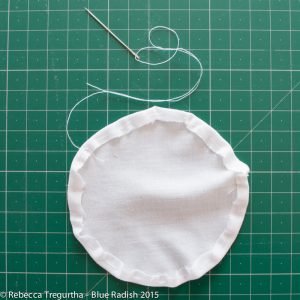
6: When you get back to your starting point, do not tie off your thread. Instead, pull the thread tail and gather up the fabric. Spread the fabric evenly along the thread and keep pulling until the puff forms and there is only a small circular hole in the middle of the puff.
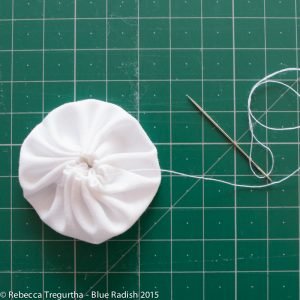
7: Now tie off the thread securely.
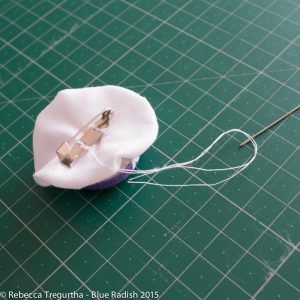
8: Take a 30cm length of thread and double it over. Take the two loose ends and thread them both through the eye of your needle. Make a small stitch through the centre of your puff from the gathered side and, before the end loop of thread disappears, slip your needle through it. This will secure the thread without needing to knot the thread. Now thread the shank of the button onto the thread and do several stitches to secure the button to the centre of the puff.

9: The last thing you need to do to turn your button puff into a brooch is to stitch the brooch pin to the back of the puff.
Notes:
The size of your finished puff will be about half the size of your fabric circle so make your template according to your preference and to suit your button. If you are going to make a few of these, make yourself a cardboard template. Cut an appropriate sized circle from some scrap cardboard (an empty cereal box?) You could also use a round saucer or bowl of suitable size.
If you want to learn more about fabric, you might enjoy exploring different ways to make marks on fabric, or try sewing projects like the painted envelope cushion cover tutorial or the fabric marker softie tutorial.
You can also experiment with textile printing techniques such as photo emulsion screen printing on fabric or learn how to make your own cheap and easy silk screens for fabric designs.
And if you’re interested in printing at home, make sure to read this guide on printing on fabric with an inkjet printer.