
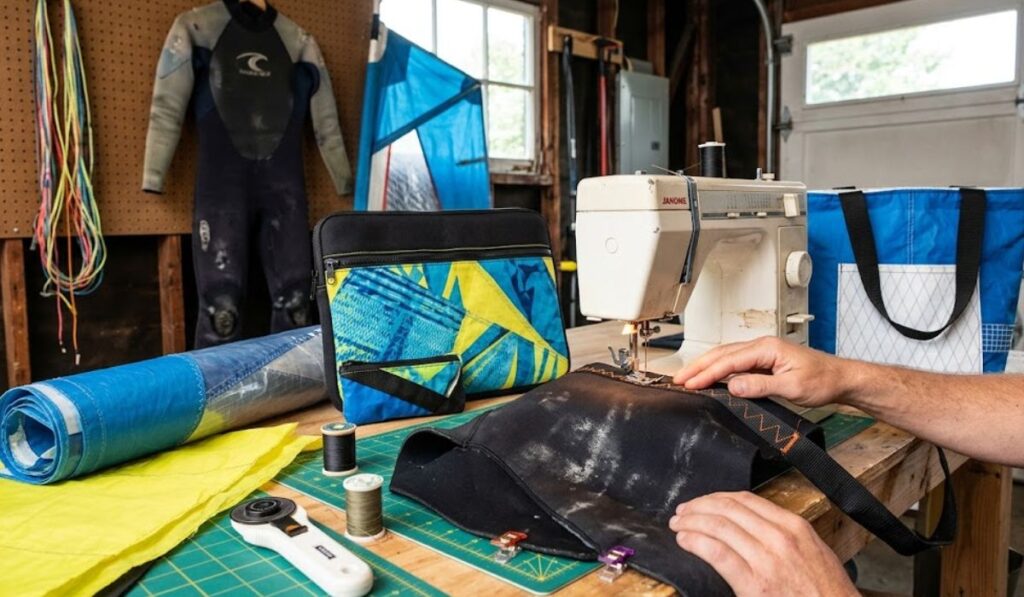

There’s a wetsuit hanging in our garage that hasn’t been in the water for three summers. The knees are shot, the seams have let go under one arm, and it still smells faintly of the last trip down the coast. Nobody wants to wear it. Nobody wants to throw it out either, and for good reason, because what’s hanging there is two square metres of a genuinely remarkable fabric.
If you sew, or you’ve ever wanted an excuse to try a new material, retired watersports gear is one of the most interesting free supplies you’ll find. Wetsuits give you neoprene. Old windsurf sails give you crisp, waterproof sailcloth and clear window film. Retired kites give you metres of lightweight ripstop in colours you’d never find in a fabric shop. All three behave very differently under a needle, and once you know how to handle them, they open up a whole category of projects.
Here’s how to get started.
Why This Gear Is Worth Rescuing
Neoprene is a synthetic rubber foam, usually laminated with a stretchy nylon jersey on one or both faces. It insulates, cushions, stretches, and never frays. It’s also notoriously difficult to recycle, which means most wetsuits end their lives in landfill once they’re past wearing.
Sailcloth and kite fabric are technical textiles engineered to hold shape under heavy loads while staying light and water-resistant. Buying comparable materials new is surprisingly expensive, when you can find them at all.
So a single worn-out wetsuit, sail, or kite can supply material for a dozen useful objects, and every one of them keeps something bulky out of the bin for a few more years.
First, Decide: Repair, Pass On, or Cut Up?
Before reaching for the scissors, it’s worth a quick triage.
Repair is the right answer more often than people think. Split seams, small tears, and worn knees on a wetsuit can usually be fixed with neoprene cement and a patch, and a dedicated repair can add several seasons.
Pass it on if it still works but no longer suits you. Boards, sails, rigs, and kites often have plenty of life left for a beginner or a lighter rider. Specialist retailers such as EASY-surfshop run second-hand and trade-in programs for exactly this reason, so gear that’s outgrown one rider can find another before it ever reaches the craft pile.
Cut it up only when it’s genuinely finished: seams failing everywhere, neoprene cracked and stiff, a sail with a blown panel that isn’t worth fixing, or a kite that’s lost its structural integrity. That’s when it stops being equipment and starts being fabric.
Preparing the Material
Clean it thoroughly. Soak neoprene in lukewarm water with a wetsuit shampoo or a mild wool wash, rinse well, and dry it inside out in the shade. Sun and heat make neoprene brittle. Sails and kites need a freshwater rinse to remove salt and sand, which would otherwise blunt your needles and scissors very quickly.
Deconstruct before you plan. On a wetsuit, cut away the zip, the collar, and any heavily taped seams, then harvest the largest flat panels. The back, chest, and thigh sections usually give the biggest usable pieces. Keep the zip too, because a heavy-duty back zip is a useful hardware find in its own right.
On a sail, pull out the battens and remove the hardware at the head, tack, and clew. On a kite, deflate and remove the bladders from the leading edge and struts, and unpick the bridle lines. The heavy woven fabric of the leading edge is a bonus material: tough, stiff, and perfect for bag bases and straps.
Map your pieces. Lay everything flat and photograph it before committing to a project. Old gear rarely gives you one large clean rectangle, so it pays to design around what you actually have.
Sewing Neoprene: What Changes
Neoprene rewards a few adjustments and punishes you if you skip them.
- Needle: a ballpoint or stretch needle for thinner neoprene, a heavier needle for 3mm and above. Always test on a scrap first.
- Stitch: a zigzag keeps some stretch in the seam and spreads the load. A slightly longer stitch length than usual helps the fabric feed.
- Feeding: a walking foot makes a noticeable difference. A Teflon or roller foot is a good second choice if the rubbery face grips.
- Holding pieces together: use sewing clips, not pins. Pins leave permanent holes and struggle to get through thicker foam.
- Cutting: a rotary cutter on a mat gives the cleanest edge. Neoprene doesn’t fray, so raw edges can stay raw.
- Seams: for thick neoprene, butt the two edges together and zigzag across the join rather than sewing a conventional seam. It sits flatter and avoids a bulky ridge. A thin line of neoprene cement before stitching makes it even stronger.
Most domestic machines cope happily with 2 to 3mm neoprene. Thicker 4 to 5mm material is where a basic machine starts to complain, so save your chest panels, usually the thickest, for projects with few seams.
Five Neoprene Projects Worth Making
- The stubby holder. The obvious one, and for good reason. Cut a rectangle roughly 21cm by 10cm and a circle about 7cm across, but wrap it around an actual can before sewing, because the thickness of your neoprene changes the fit. Butt-seam the long edge, then attach the base.
- A laptop or tablet sleeve. Measure your device, then add around 2 to 3cm to both width and length to allow for the thickness of the foam. Two panels, three seams, and the wetsuit’s own zip if you want a closure. This is the project that makes people ask where you bought it.
- Sunglasses, phone, or pencil cases. Small, quick, and forgiving, which makes them ideal first experiments while you get used to the material.
- A garden kneeler. Stack two or three layers of thick neoprene, stitch around the edge, and you have a kneeling pad that shrugs off wet grass and hoses clean.
- Drink bottle and lunch-box sleeves. Neoprene’s insulation keeps things cool on a hot day. Wrap, measure, butt-seam, done.
Sailcloth and Kite Fabric: A Different Animal
If neoprene is forgiving, sail materials are crisp and unforgiving. The rules change almost completely.
Windsurf sailcloth is often a mix of materials. The large clear panels are usually monofilm, a laminated plastic film; other panels may be woven or reinforced with a visible grid of fibres. Monofilm is stiff, crinkly, and completely waterproof. Every needle hole is permanent, so plan seams once and sew them once. Use a sharp needle rather than a ballpoint, a longer stitch length to avoid creating a perforated tear line, and clips instead of pins. Avoid sharp folds, because older film can crack along a crease.
Kite fabric is lightweight ripstop, usually polyester or nylon, with the characteristic grid woven in to stop tears spreading. It’s slippery and it frays. Use a fine sharp needle, a slightly shorter stitch, and finish every raw edge. French seams work beautifully, or you can seal edges with a hot knife. If you do use heat, work somewhere well ventilated and keep it well away from anything flammable.
Projects for Sail and Kite Fabric
- A waterproof tote from a windsurf sail. Use the reinforced panels for the body and the clear monofilm as a window or a pocket. Webbing handles and a leading-edge-fabric base make it strong enough for a weekly market run.
- A wash bag or cosmetics pouch. Monofilm is ideal: waterproof, wipe-clean, and you can see what’s inside. Add a zip and bind the edges with bias tape to protect the film from cracking.
- Drawstring stuff sacks from kite ripstop. Light, packable, and in colours bright enough to find at the bottom of any bag. A set in graduated sizes makes a lovely gift for a camper or traveller.
- Bunting. Kite canopies were practically designed for it. Cut triangles, finish the edges, and string them on a length of the old bridle line, which is exactly the right weight for the job.
- Reusable produce bags. Lightweight ripstop makes excellent washable bags for loose fruit and vegetables, and a drawstring from recycled line finishes them off.
A Few Honest Cautions
Not everything will work. Neoprene that’s gone stiff and cracked is past saving even as fabric, because it’ll keep cracking in whatever you make. Very old monofilm may be too brittle to sew at all; test a scrap by folding it before committing.
Expect a few failed experiments, particularly with sail materials. That’s part of the fun, and it’s also why free, already-retired gear is the perfect material to learn on.
The Satisfying Part
There’s something genuinely pleasing about carrying a tote made from a sail that once crossed a bay, or handing someone a stubby holder cut from the wetsuit you learned to surf in. Each object carries a small story that nothing from a shop ever will.
And that wetsuit in our garage? It’s going to become two laptop sleeves, a garden kneeler, and at least six stubby holders. After three summers of guilt, it feels like the right ending.
